Terry Hope Romero

Bestselling author of Show Up For Salad, Veganomicon, Salad Samurai, Vegan Eats World, and more!

Tag: Exotic ingredients

File under Obsessions: Roasted Peanut Flour

Peanut flour. Two words that go great together (insert “roasted” in the middle and that’s where the magic is…skip the raw variety). A while back I picked up a little bag a Trader Joe’s and since then I fear it’s no longer regularly stocked, but but fortunately a quick search reveals it’s alive and well via shopping online.

Besides blending with a little almond milk and a touch of agave for a lower-fat peanutty dip for apple slices and chilled grapes, roasted peanut flour excels in baked goods. And adds a protein boost too. But this flour is best at adding peanut butter depth and richness to recipes without the oily heaviness often associated with peanut-butter flavored baked goods. In fact, I think I just might prefer peanut butter cookies made only with the addition of roasted peanut flour.

The following recipe is a gluten-free cookie developed a while ago for a project that’s on the back burner for now, but still equals great peanut butter cookies with a light texture and plenty of peanut aroma. Regarding the gluten free flour mix, use your favorite purchased blend (like Bob’s Red Mill Gluten Free Baking Mix), our blend from Vegan Cupcakes Take Over The World, or a blend of rice and oat flour (with perhaps a touch of coconut or quinoa flour for body).

I’ve since then “glutenized” this recipe for myself by using an equal amount of whole wheat pastry flour in place of the GF mix. I love how the cinnamon and brown sugar compliment the toasty notes in the peanut flour too. And I’ve even replaced ⅓ cup of the oil with apple sauce for a moist, tender peanutty-cookie with less overall fat. However you pick your peanuts, these little cookies can be changed and re-arranged to suit your peanut butter treat needs.
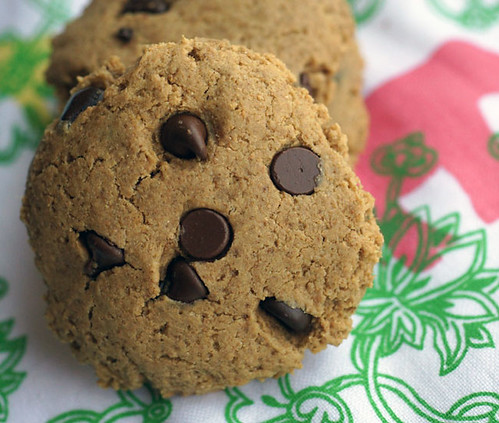
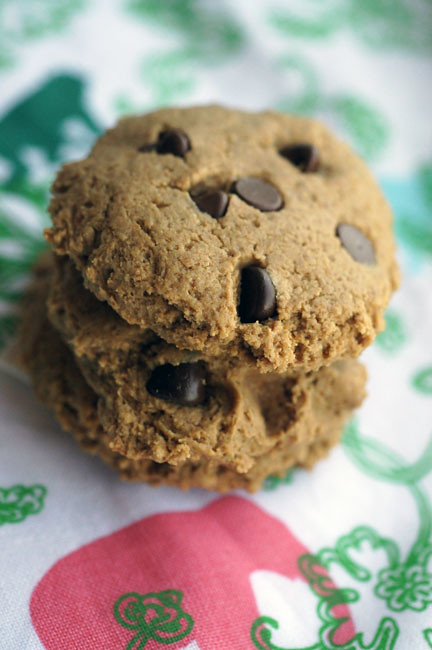
Roasted Peanut Butter Cookies
makes about 2 dozen small cookies

Looking for a light and leaner cookie? Substitute ⅓ cup of unsweetened apple sauce for ⅓ cup of the oil.

1 1/2 cups gluten-free baking mix or whole wheat pastry flour
1/2 cup roasted peanut flour
1/2 teaspoon baking soda
½ teaspoon ground cinnamon
1/2 teaspoon salt
3/4 cup dark brown sugar, lightly packed
1/4 cup plain almond milk
1 1/2 teaspoons pure vanilla extract
2/3 cup peanut, sunflower or canola oil
2/3 cup semi-sweet chocolate chips

1. Preheat the oven to 350 degrees and line a large baking sheet with parchment paper. In a large mixing bowl sift together gluten free baking mix (or flour), roasted peanut flour, baking soda, cinnamon and salt.

2. In a separate bowl whisk together brown sugar, almond milk, vanilla extract and oil until smooth. Pour into the dry mixture and use a wooden spoon or rubber spatula to stir just enough to form a thick dough. Add chocolate chips and gentle fold into the dough with your hands, pressing in any chips that pop out. Drop by generous tablespoons onto the parchment paper, spaced about 3 inches apart. If desired press a few extra chips into the tops of cookies, then press down on each cookie with your palm or back of a measuring cup to flatten.

3. Bake for 10-11 minutes, then remove from oven and cool on baking sheet for 2-3 minutes. Use a spatula to lift cookies and move onto wire rack to complete cooling. Store tightly covered. Tightly wrapped these cookies also freeze very well; let stand on a counter top to reach room temperature or gently warm in the microwave for 10-15 seconds.
Midwestern nice for better pies

It’s been a week yet since I’ve returned to NYC, but I can feel the difference still when it comes to making pies in the big city and in the green rolling ‘burbs of Omaha, Nebraska. Though I was working most of my time there on Isa and my upcoming vegan pie book, it did me good to get away from my environs and experience baking outside of my urban comfort zone. Omaha is wonders to nurture my inner pie goddess: green lawns, tree-lined streets, gentle hills (and goofy me thinking that all of the midwest was suppose to be flat!), and many windowsills to set cooling pies to rest.

My apartment windows back home don’t exactly have sills, so maybe this plus a helping of “midwestern nice” (as suggested by a Facebook fan) added a special something for better pies. That and making crusts for months on end; if there’s one thing I learned about making pies is that practice is the ultimate secret ingredient. Prior to working on this book I thought myself an decent enough pie baker. Now a hundred or so pies later I’m a changed woman. At least when it comes to some pastry; now I’m hell with a rolling pin and a pastry cutter. Months of self-inflicted pie bootcamp have given me a new found confidence in making and baking (especially crusts), that could not have been gained anywhere else. So my kitchen mantra for you this week: If you think you stink at baking, it’s just because you haven’t done it enough.

Beyond the baking and photography and writing, I’m pleased to say that my interest in pie has only increased. I’ll be frank that in the past I needed a vacation post-cookbook from cupcakes and even cookies (and do I ever love cookies), but my interest in all things encased in crust has piqued. This post’s apple pie isn’t even in the book (no worries, we have an abundance of apple recipes in store for you all), but really, one can never have too much apple pie.

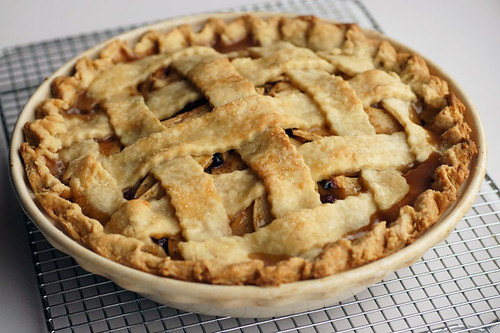
The addition of homemade garam masala, the classic Indian spice blend featuring coriander, cardamom and black pepper (and many more, depending on the particular blend), adds a lush peppery warmth to an otherwise standard recipe. The addition of a tart soy yogurt, extra lemon juice and a little less sugar than usual resulted in maybe my favorite apple pie so far: heat, less sweet and full of tart apple flavor. A pie that’s full of both nice and spice, no matter where in the world your window sill may be.

Garam Masala Apple Pie
makes one 10 inch deep dish pie

Garam masala, that classic Indian spice blend, makes for a radiant addition to one’s apple pie spice rotation. Look for it on the shelves of gourmet markets or anywhere Indian or Asian groceries are sold.

Use your crust of choice, homemade or frozen store bought. For apple pies I usually prefer a solid “blanket” upper crust, but I was playing with making lattice tops the day I made this pie, hence the images above.

If you do go for a lattice I suggest topping the pie with foil after the oven temperature has been reduced to 350 and removing it the last 15 minutes or so of baking. The extra coverage will help ensure the apples are properly roasted for a maximum tender, melt-in-your-mouth effect.

1 recipe double pie crust of your liking
⅓ cup lemon or vanilla soy yogurt
3 tablespoons lemon juice
¼ cup all purpose flour
1/2 cup granulated sugar
2 tablespoons brown sugar
2 1/2 teaspoons garam masala spice mixture
½ teaspoon ground cinnamon
1 teaspoon grated fresh ginger
Pinch salt
2 ½ lbs granny smith (about 6 grannies) or any tart, firm apples
2/3 cup raisins any dried fruit blend (cherries, cranberries, golden raisins, etc.)
Soy milk for brushing
A little turbinado sugar for sprinkling

Fit bottom crust into a deep dish 10 inch ceramic pie dish and roll out upper crust (or form into a lattice); chill both crusts while pre-heating the oven and making the filling.

In a large mixing bowl whisk together soy yogurt, lemon juice, all purpose flour, sugar, brown sugar, garam masala, cinnamon, ginger and salt. Peel, core and slice apples into ⅛ inch thin slices. Add to yogurt mixture, add raisins and fold with a rubber spatula until apples are coated with mixture. Pack into bottom crust, top with top crust, and crimp the edges. Brush with soy milk and sprinkle with sugar. Chill apple pie for 20 minutes.

Preheat oven to 425 degrees. Cover edges of crust with pie crust protectors and bake pie for 20 minutes, then reduce oven to 350 degrees. If desired cover edges of crust with pie crust protectors or crimp edges with strips of foil. Bake pie for another 55-65 minutes or until filling is bubbling through the edges. If the pie appears to be browning too soon before it’s done cover top with foil, but remove about 15 minutes before it’s done. Remove from oven and let cool 30 minutes before slicing.

Rad for Rampe (and pumpkin curry)

Greetings from the frozen depths of central Queens! This winter is shaping up to be one of the worst in recent memory in NYC, but bad winters mean one thing to me and that’s staying inside and making good curries. Curries have roots in mild, often tropical climates but it’s the riot of spices and vegetables performing culinary kung fu that kicks the hell out of most any frozen day.

Sweet winter squash is the obvious choice ingredient for a mid-January Sri Lankan style pumpkin curry. One of my favorite aromatic herbs unique to this dish are frozen rampe (RAHM-peh) leaves (as seen in the photo above), also known as pandan, the awesomely sophomoric sounding screwpine or if packaged in Thailand, bai toey. My friend Danaher–who’s been schooling me in Sri Lankan cuisine since last year–opened my eyes to rampeh last year at his annual birthday dinner that’s a virtual Sri Lankan curry-a-thon. Since then I’ve been hooked on this grass-like herb, obsessed with how a few stalks rampe infuses into food the mouthwatering aroma of gentle citrus and toasted vanilla. That particular flavor really blooms in this sweet, mellow winter squash curry, but if you can’t find rampe near you don’t hesitate to make a batch without it.

But with a little help from online shopping it’s possible to get that authentic flavor with pandan essence, if you can’t find the frozen leaves at an ethic grocery that stocks Southeast Asian goods. My friend usually makes a special trip to Kalustyan’s in Manhattan to replenish his frozen rampe stash, but I found mine for a paltry $1.30 at a tiny Thai grocery in Woodside in the Queens. Without further ado, my favorite pumpkin curry recipe, at least this week, great with any aromatic rice or even a crusty baguette. If you do go for the rice, try poking a few strips of frozen rampe into the rice just before covering for the final simmer for an extra splash of that exquisite vanilla creme aroma.

Pumpkin Coconut Curry
Serves 4 along with steamed rice or bread

If good quality pumpkins are in short supply near you (they are by me), butternut and kabocha squash are usually plentiful, of decent enough quality and always make for tasty curry. If using kabocha you may need to cut down on the final simmer: this starchy squash cooks somewhat faster than it’s crisper cousins.

2 lbs pumpkin, butternut or kabocha squash
1 medium red onion
2 tablespoons chopped garlic
3 tablespoons dried shredded unsweetened coconut
1 tablespoon vegetable or coconut oil
½ teaspoon black mustard seeds

4-6 curry leaves, fresh or frozen

4-6 three inch pieces of frozen rampe leaves
1 1/2 teaspoons coriander seeds
1 teaspoon cumin seeds
½ teaspoon ground turmeric
1-2 dried hot red chile peppers (optional)
¾ teaspoon sea salt or to taste
One 3 inch cinnamon stick
1 cup coconut milk (reduced fat coconut milk is fine)
½ cup vegetable broth

1. Wash the squash, removing any dirt or debris. With a sharp Y-shaped vegetable peeler scrape off the skin and remove the seeds and the stringy flesh around the seeds. Cut the squash into 1 inch cubes. Peel and roughly chop the onion, then place along with the garlic into the bowl of a food processor.

2. Over a low heat in a heavy-bottomed frying pan, dry roast the coconut until golden brown, stirring frequently with a wooden spoon. Watch carefully, as the coconut will appear not to be doing anything then bam!, suddenly roasted coconut. Just as the coconut is starting to get dark pour into the food processor along with the chopped garlic and onion. Add 2 tablespoons of water and grind to a smooth paste, stopping to scrap the sides of the bowl frequently with a rubber spatula. In a separate clean spice grinder grind together coriander and cumin seeds, ground turmeric, and chile peppers.

4. In a large measuring cup combine the coconut milk with vegetable broth and salt. In a heavy pot with a lid add oil, heat over medium heat and the mustard seeds, cover and fry until the seeds begin to pop. Add the curry leaves and the ground spices, cover and fry for 30 seconds. Stir onion mixture into the sizzling spices, fry for 1 minute then add coconut milk mixture, cubed pumpkin and cinnamon stick. Partially cover and gently simmer for 15-20 minutes or until a fork easy pierces a tender chunk of pumpkin. If liquid level reduces too much add ¼ cup more broth or water, but not too much: the curry should be moist but not swimming in liquid. Remove from heat, let stand covered for 10 minutes and serve with hot cooked aromatic rice or Indian-style flatbread.

Powered by WordPress & Theme by Anders Norén